tutoriel gratuit sac à dos en cuir pour enfant
Round backpack for children: learn the simplified sewing of leather by making a backpack that looks like a cat. Convenient for carrying a cuddly toy, a snack or even a notebook to kindergarten.

Bag diameter : 27 cm
Bag thickness : 9 cm
Download the pattern
This free pattern is for private use only. It is to be printed in real size. Download the PDF pattern
Supplies
Max cost: 45,00 €
The products needed to complete this tutorial
France 🔵⚪🔴
Patron de sac à dos en cuir chat pour enfant de Deco Cuir, modèle en tissu et cuir, illustré avec détails visibles.Livre et patron Deco Cuir pour sac à dos en cuir chat pour enfant, illustration du modèle et détails du design.
Italie 🟢⚪🔴
Peau de cuir de veau SATINLYS couleur cappuccino, texture lisse et souple, pour projets de maroquinerie ou couture.Sac à dos en peau de cuir de veau SATINLYS couleur cappuccino, finition satinée, avec détails en cuir naturel.
From
Sale price18,00 €
  • AREA: from 0.20 to 0.29 m² from 0.50 to 0.59 m² from 0.60 to 0.69 m² from 0.70 to 0.79 m² from 0.80 to 0.89 m² from 1.30 to 1.39 m² from 1.50 to 1.59 m² from 1.70 to 1.79 m²
Gamme suivie Italie 🟢⚪🔴
Cuir nappa lisse couleur taupe clair. Peau de cuir nappa idéale pour la fabrication de maroquinerie (sac, pochette...), portefeuille, porte-monnaie, accessoire et décorationCuir nappa beige. Cuir lisse, fin et souple, idéal pour la conception de sac à main, pochette, petite maroquinerie...
From
Sale price34,66 €
  • AREA: from 0.50 to 0.59 m² from 0.60 to 0.69 m² from 0.70 to 0.79 m² from 0.90 to 0.99 m² from 1.10 to 1.19 m² from 1.20 to 1.29 m² from 1.40 to 1.49 m² from 1.80 to 1.89 m²
Gamme suivie Italie 🟢⚪🔴
Morceau de cuir de veau SATINLYS marron, tissu souple et élégant, destiné à la maroquinerie ou à la couture artisanale.Morceau de cuir en veau SATINLYS marron, texture lisse et élégante, destiné à la maroquinerie ou couture.
From
Sale price2,72 €
  • Blue
  • SIZE: 15x20cm 20x30cm 30x40cm
  • THICKNESS: 0.5 mm 0.8mm 1.2mm
Gamme suivie Italie 🟢⚪🔴
Morceau de cuir de veau nappa marron terre de Sienne. Cuir lisse et souple idéal pour la fabrication de petite maroquinerie, accessoire et prototypeCuir nappa couleur marron terre de Sienne. Cuir lisse, souple et fin qui s'adapte parfaitement pour la création de sac, pochette, petite maroquinerie, étui de téléphone...
From
Sale price2,72 €
  • SIZE: 15x20cm 20x30cm 30 x 40 cm
  • THICKNESS: 0.5mm 1mm
Fermeture zippée en nylon noir, 4mm d'épaisseur de maille. Plusieurs longueursFermeture à glissière noire en nylon. Plusieurs longueurs disponibles. Fermeture zippée idéale pour la fabrication de maroquinerie, vêtement, ameublement...
From
Sale price0,34 €
  • LENGTH: 14cm 16cm 18cm 20cm 22cm 25cm 30 cm 35cm
Italie 🟢⚪🔴
Boucle coulissante en laiton vieilli, fil épais, 20x18 mm pour bijoux ou créations en métal.Boucle coulissante en laiton vieilli avec fil épais, pièce de bouclerie pour bijoux ou accessoires.
From
Sale price0,40 €
  • SIZE: 20mm 25mm 30mm 35mm 40mm 50mm
Italie 🟢⚪🔴
Anneau demi-rond en acier et laiton vieilli, bouclerie de 8mm pour bijoux ou créations artisanales.Anneau demi-rond en acier avec finition laiton vieilli, bouclerie artisanale pour création de bijoux.
From
Sale price0,07 €
  • WIDTH: 8mm 10mm 12mm 14mm 16mm 18mm 20mm 25mm
Embout de sangle à griffe DESIGN en laiton vieilli, accessoire pour sangle de 19 mm, finition élégante et vintage.Embout de sangle à griffe en laiton vieilli pour maroquinerie ou sacs en cuir, accessoire de finition design.
From
Sale price1,42 €
  • WIDTH: 19mm 24mm 29mm 39mm
  • CONDITIONING: Per 10
Sangle en nylon beige de mercerie, robuste et durable, pour projets de couture ou bricolage.Sangle en nylon beige pour mercerie, vue rapprochée d'une sangle en nylon beige sur fond neutre.
From
Sale price2,70 €
1,93 € / m
  • WIDTH: 20mm 25mm 30mm 40mm
  • LENGTH: 10 meter reel 1 meter
Italie 🟢⚪🔴
Bobine de 100m de fil polyester tressé et ciré Vieux Rose de 0,8mm, idéal pour couture et mercerie.Bobine de 100m de fil polyester tressé et ciré Vieux Rose, diamètre 0,8mm, pour travaux de mercerie et broderie.
Italie 🟢⚪🔴
Finition de tranche Colorcut gris foncé, 30ml, en bouteille pour teintures et peintures, appliquée sur une surface.Nuancier de couleurs pour finition de tranche Colorcut en cuir, teinture bleue, zoom sur les nuances disponibles.
Sale price6,98 €
Italie 🟢⚪🔴 Laiton
Rivets moyens en laiton avec calotte simple, en nickel, pour accessoires de maroquinerie, de la marque Deco Cuir.Rivets moyens en laiton avec calotte simple pour accessoires, de la marque Deco Cuir, montrés en gros plan.
From
Sale price2,50 €
0,15 € / item
  • FINISHING: Nickel plated Brass Aged brass
  • CONDITIONING: Per 20 Per 100 Per 1000
25 aiguilles sellier John James L3912 avec bout rond pour couture et maroquinerie, visibles sur l'image.Aiguilles sellier John James L3912 avec bout rond, ensemble de 25 aiguilles de mercerie pour couture et travaux de sellerie.
From
Sale price3,53 €
  • DIAMETER: 0.80mm 1mm 1.10mm 1.40mm 1.60mm

The Required Materials

  • 1 piece of SATINLYS or NAPPA CALFSKIN - 0.35m² (at minimum). We invite you to contact customer service for the size of the leather piece. For nappa calfskin, you can slightly reinforce the leather with a 0.4 mm thick Salpa reinforcement.
  • 1 piece of SATINLYS leather - Brown - 15 x 20 cm - 1.2 mm thick
  • 1 NYLON #4 zipper - Brown - 25 cm long
  • 2 sliding buckles - antiqued brass - 30 x 13 mm
  • 2 half-round rings - antiqued brass - 30 x 25 x 3 mm
  • 2 DESIGN strap ends with prongs - antiqued brass - 29 mm
  • 2 meters of beige nylon webbing - 30 mm wide
  • 1 spool of braided and waxed polyester thread - 0.8 mm diameter - brown
  • 1 NOISETTE edge finish - Colorcut - 30 ml
  • 1 tube of special leather contact adhesive
  • 1 kit of 24 double-cap rivets (T4) and setting tools - 9 mm - antiqued brass
  • 1 set of 25 saddler's needles - round point - size 1/0 - d=1.1 mm
  • 1 GRAND CHAT cutout for a customizable natural leather keychain (optional)
  • 1 round keychain ring - 25 mm diameter (optional)


  • 1 round strike-on hole punch - SEIWA Japan - diameter: 1.5 mm
  • 1 utility knife and 1 rotary cutter
  • 1 mallet
  • 1 fine abrasive sponge - 400 grit
  • 1 adhesive masking tape
  • 1 joiner hammer
  • 1 erdalon board
  • 1 cutting mat

cat backpack

WHAT IS SIMPLIFIED LEATHER SEWING? 

This "pre-punched" hand leather sewing technique makes this tutorial accessible to everyone. You can, of course, choose to do a "standard" saddle stitch. 
SEE THE GUIDE >
simplified sewing

To get started: 

Would you like to practice before embarking on making a leather backpack? Here is a simpler version, the cat coin purse:
SEE THE COIN PURSE TUTORIAL >

Cat coin purse
Cat coin purse

TUTORIAL VIDEO

1. CUT OUT THE PATTERN PIECES 

Download the pattern and print it in full size (to download in the tab at the top of the page). Cut out the pattern leaving about 1 cm margin at the edge of the different pieces. 
Cat backpack

2. POSITION THE PIECES ON THE LEATHER 

Tape (using masking tape so as not to damage the leather) the pattern pieces onto the leather piece. Note, pieces no. 5, 6, 7, 8 and 9 (cat face) are to be taped onto the small piece of leather (different color from the body of the bag). 

Cat backpack tutorial

To prepare the pieces for sewing: punch the holes indicated on the pattern using a round strike-on hole punch of 1.5 mm diameter. 

Cat backpack tutorial

Then, cut out the different pieces, following the lines, with a utility knife and/or rotary cutter. For cutting the eyes, we used a round strike-on hole punch of 25 mm. 
Cat backpack tutorial

Cat backpack tutorial

3. WORK THE FACE SHAPES 

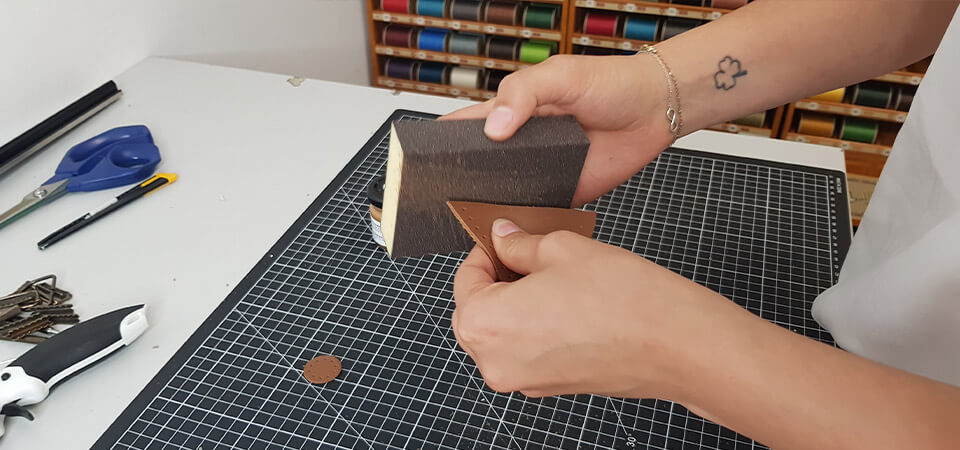
Sand the edges of the small face pieces (P5, 6, 7, 8, 9), the rectangle (P4) and the inner rectangle intended for the zipper (P3) as well as the ends of P3.
Cat backpack tutorial

Work the edges of these pieces by applying edge dye. Apply 2 to 3 coats and sand between each coat. 

Cat backpack tutorial

4. START THE LEATHER SEWING 

Start by sewing the cat's whiskers and mouth. For this:

Cut the thread: generally equivalent to 4 or 5 times the length of the sewing line.

Thread a needle at each end of the thread:

  • Stitch the thread at needle height then re-stitch 2 times.
  • Flatten the end of the thread and pass it through the eye of the needle.
  • Pull the thread to tie the knot (see guide).
  • Do the same to thread the other end of the thread on the second needle.

Pass one of the needles through the 4th hole and even out the threads (see photo 3). For aesthetic reasons, we started the sewing at the 4th stitch to make 3 double stitches and thus have symmetry with respect to our final stitch (the 3 stop stitches) => to do only if the stitches do not meet (see photo 4).

Sew by passing each needle through each hole one by one.
Then tighten the stitch well.
To finish the sewing: make 3 stop stitches, cut the thread flush then burn it (if polyester).
Finally, hammer the stitches with a joiner hammer.
SEE THE GUIDE ON SIMPLIFIED LEATHER SEWING >

cat backpack tutorial

cat backpack tutorial

5. GLUE THE LEATHER PIECES BEFORE SEWING 

Glue the cat's eyes, nose and ears with contact adhesive. Wait a few moments for the glue to soak in before gluing the leather pieces. Also glue the zipper (see photo 2). 

Cat backpack tutorial

Do the different stitches of the face and that of the zipper. Tap the stitches with a joiner hammer to flatten them.  

Cat backpack tutorial

6. FORM THE ROUNDNESS OF THE BAG 

After sewing the zipper, glue the two ends of the strip (P3) to form a circle. Be careful at the time of gluing: check that the holes are well facing each other. Then, sew a rectangle to form the roundness.  

Cat backpack tutorial

Cat backpack tutorial

7. CUT AND POSITION THE STRAPS 

Cut the nylon webbing into:

  • 2 pieces of 70 cm
  • 2 pieces of 15 cm
  • 1 piece of 22 cm

Cat backpack tutorial

  • Pass a half-round ring and center it on each 15 cm strap.
  • Fold the strap over itself and place a strap end (and burn the protruding threads for a nice finish).
  • Then rivet (T4 rivets) the two thicknesses of the strap to lock the half-round ring.  
Cat backpack tutorial

Position each strap on piece no. 1 at the place indicated on the pattern (blue dots). Then rivet and sew the pieces. 

Cat backpack tutorial

Hold the end of each strap with a T4 rivet. 
Cat backpack tutorial

Take the 70 cm straps.
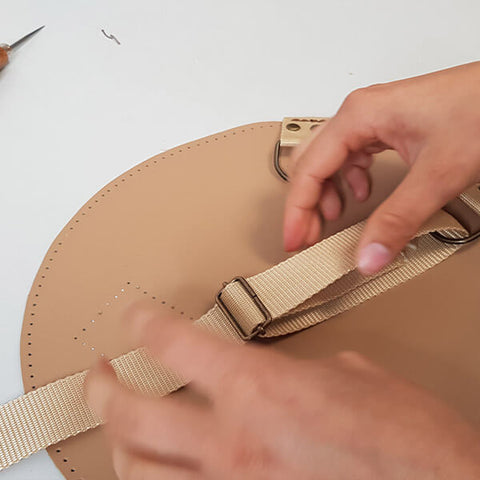
To have an adjustable strap: pass the sliding buckle through the strap then pass the strap through the half-round ring. Pass the end of the 70 cm strap back through the sliding buckle (photo 2). Then, close with a strap end (do not forget to burn the threads).  

Cat backpack tutorial

To properly hold the strap, rivet the two thicknesses of the nylon strap together (be careful to rivet the right thicknesses).
Cat backpack tutorial

Burn the ends of the nylon straps so they do not fray. Then, glue the ends of the 70 cm straps into the rectangle provided on piece no. 1. Finally, attach the straps with rivets (see the position of the holes on the pattern). 

Cat backpack tutorial

Take the 22 cm strap.
Glue the ends of the handle into the rectangle, then rivet*.

*If you wish, you can place the rivets after gluing piece no. 4 to prevent the leather from "warping". 
Cat backpack

To finish, glue the P4 rectangle then sew it on piece no. 1. 

Cat backpack tutorial

Cat backpack tutorial

8. FORM THE BAG 

Before starting the sewing, hold the pieces together with sewing clips.
Cat backpack tutorial

Sew edge to edge, right sides together, piece no. 1 and piece no. 3, then piece no. 2 and piece no. 3. Pass each needle through each hole and tighten the stitch well.  

Cat backpack tutorial

Cat backpack tutorial

Passing the needle can be more difficult at the straps (too thick). Use a round awl and clips to force the needle through. 

Cat backpack tutorial

Finally, hammer the seams with a joiner hammer.
Cat backpack tutorial

9. WORK THE EDGES 

Sand the edges of the backpack, then apply edge dye. Repeat the process 2 to 3 times if necessary.

Cat backpack tutorial

10. MAKE THE NAME KEYCHAIN (OPTION) 

Moisten the cat-shaped keychain. Then, stamp the name with alphabet stamps.
Thread the half-round ring through the hole provided in the leather cutout, then attach the keychain to the backpack zipper. The keychain will make it easier to open the zipper.
SEE THE GUIDE >

Cat backpack tutorial

Cat backpack tutorial

YOUR CAT BACKPACK IS FINISHED! 

Cat backpack tutorial

Cat backpack tutorial

FEEL FREE TO PIN THE PHOTOS ON PINTEREST TO SHARE THE ARTICLE! 

Cat backpack tutorial

Your achievements
Do not hesitate to send us photos
©Caroline Leplat - Version couture point sellier

©Caroline Leplat - Version couture point sellier

©Caroline Leplat - Version couture point sellier

©Caroline Leplat - Version couture point sellier

©Lalie_customshoes - Version couture simplifiée

©Lalie_customshoes - Version couture simplifiée

©Lalie_customshoes - Version couture simplifiée

©Lalie_customshoes - Version couture simplifiée

©Agnès Chouky - Version couture machine

©Agnès Chouky - Version couture machine

Leave a comment

All comments are moderated before being published